Set up the Kubernetes Connector with a self-managed API Key
In this article, we show how ConfigSeeder Kubernetes Connector can renew its own API Key (aka self-managed API Key), which reduces tedious manual work.
Introduction
In our Blog Article Using the Kubernetes Connector, we suggest a set up with two layers of Kubernetes Connectors:
- The Infrastructure Kubernetes Connectors are responsible to provide the API Keys for all other Components (including other Kubernetes Connectors)
- The Application Kubernetes Connectors are responsible to provide ConfigMaps & Secrets used by the Applications.
The reason for this recommendation is that with this setup, only the API Keys for the Infrastructure Kubernetes Connectors have to be created manually. The API Keys required by the Application Kubernetes Connectors can be managed by the Infrastructure Kubernetes Connectors.
This setup has some advantages and some drawbacks. One major drawback is, that the Infrastructure Kubernetes Connectors requires an API Key with far-reaching permissions (normally all configuration groups and one environment), and permission to manage secrets in potentially a lot of namespaces of other applications.
This article describes how to use the Kubernetes Connector with a self-managed API Key – meaning a setup in which the Kubernetes Connectors are able to replace and renew the API Keys they need to access ConfigSeeder®. When all Application Kubernetes Connectors are able to manage their own API Keys, the need for Infrastructure Kubernetes Connectors diminishes.
Problem statement
This article addresses the following situation:
- The Kubernetes Connectors requires an API Key to access ConfigSeeder®
- All API Keys have a finite lifetime and therefore must be replaced regularly
- Creating and renewing API Keys and storing them in Secrets is a troublesome task and should be automated
- The solution proposed in the Blog Article Series Using the Kubernetes Connector is quite complex and not always required.
Kubernetes Connectors with self-managed API Keys
The following conditions must be met for the Kubernetes Connector to manage an API key stored in a secret:
- The Kubernetes Connector must be allowed to execute CRUD operations on the Secret holding the API Key
- The Secret must be annotated with the correct Annotations so the Kubernetes Connector knows it is allowed to manage the Secret
- An assembly of type
Secret: API Keythat matches the API Key must exist - The Kubernetes Connector must be configured to process this assembly
If these requirements are fulfilled, the Kubernetes Connector will be able to manage its own API Key.
Solution Overview
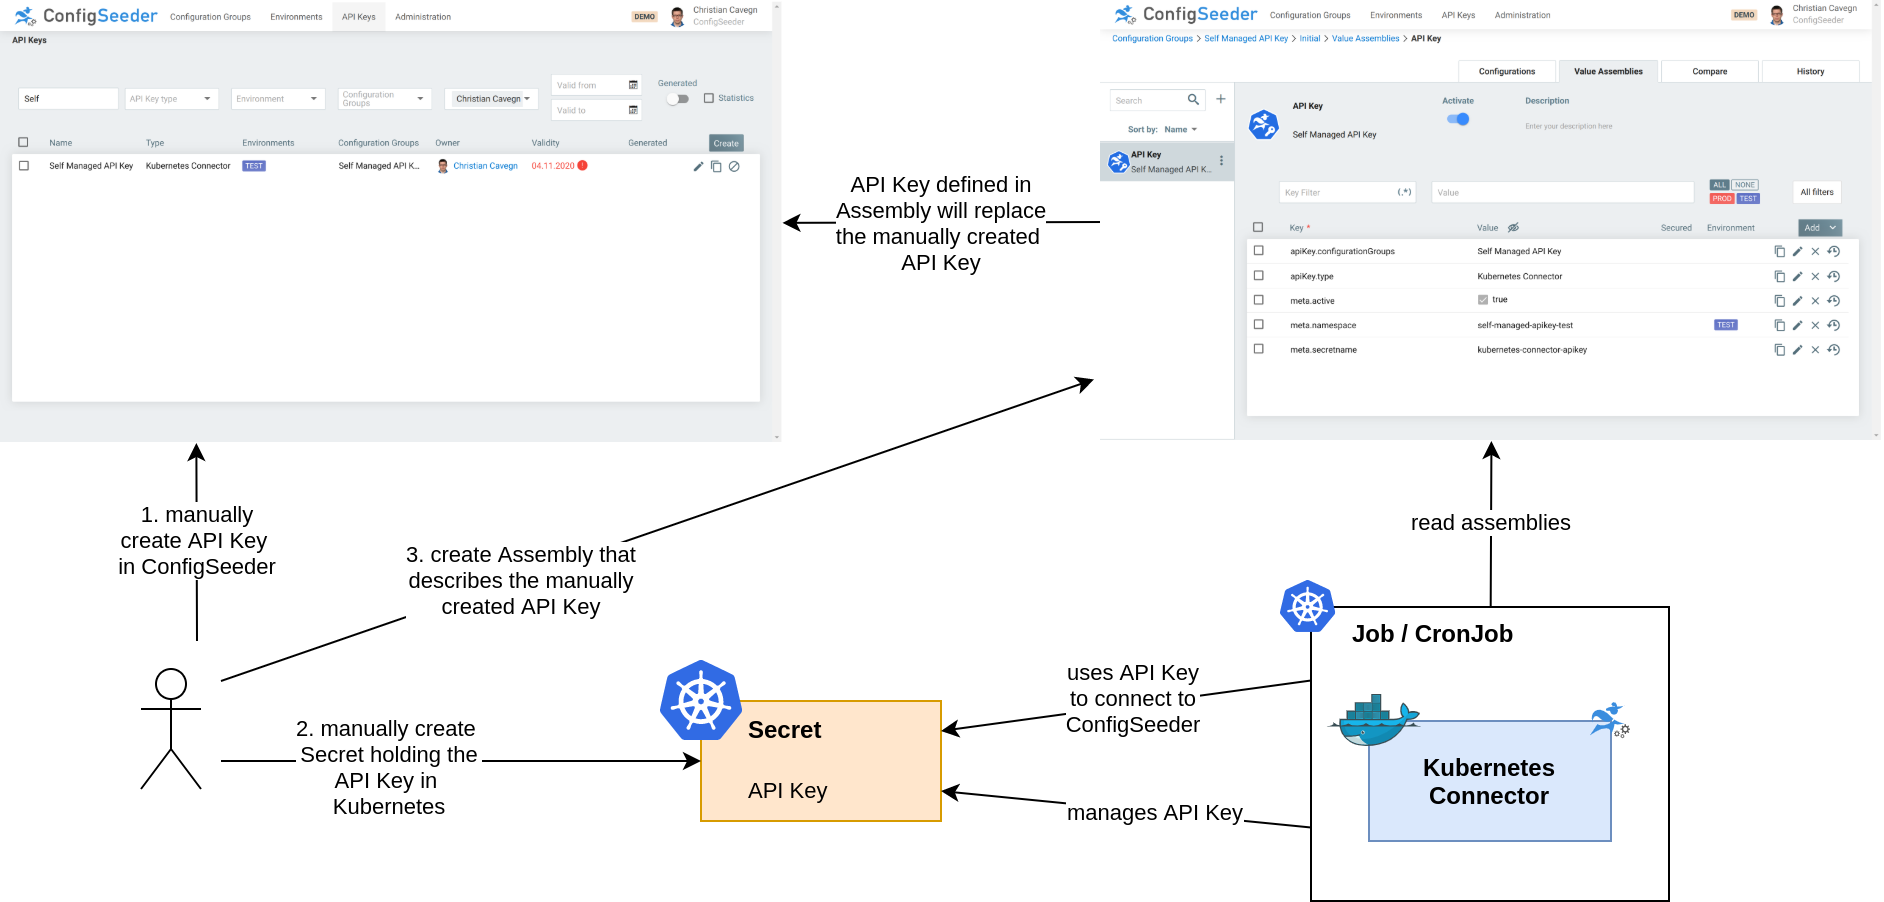
- In the first step, the User creates the API Key and provisions it on the Kubernetes Cluster.
- The User then creates an assembly that describes the API Key created in the first step
- When the Kubernetes Connector is installed, he will replace and manage the Secret holding the API Key based on the Assembly created in the second step.
In the following section, the setup is explained in detail.
Setup
Install a Kubernetes Connector self-managing it’s API Key with the following instructions:
- Create the Configuration Group
self-managed-apikeyand the EnvironmentTEST - Create an API Key to be used by the Kubernetes Connector
- Choose Type Kubernetes Connector
- Grant Access to
self-managed-apikeyandTEST
- Choose a short Lifetime of 2 days, this API Key will be replaced by the Kubernetes Connector
- Choose the name
Self Managed API Key-API Key(The Kubernetes connector uses the pattern <Application>-<Name> for naming API Keys)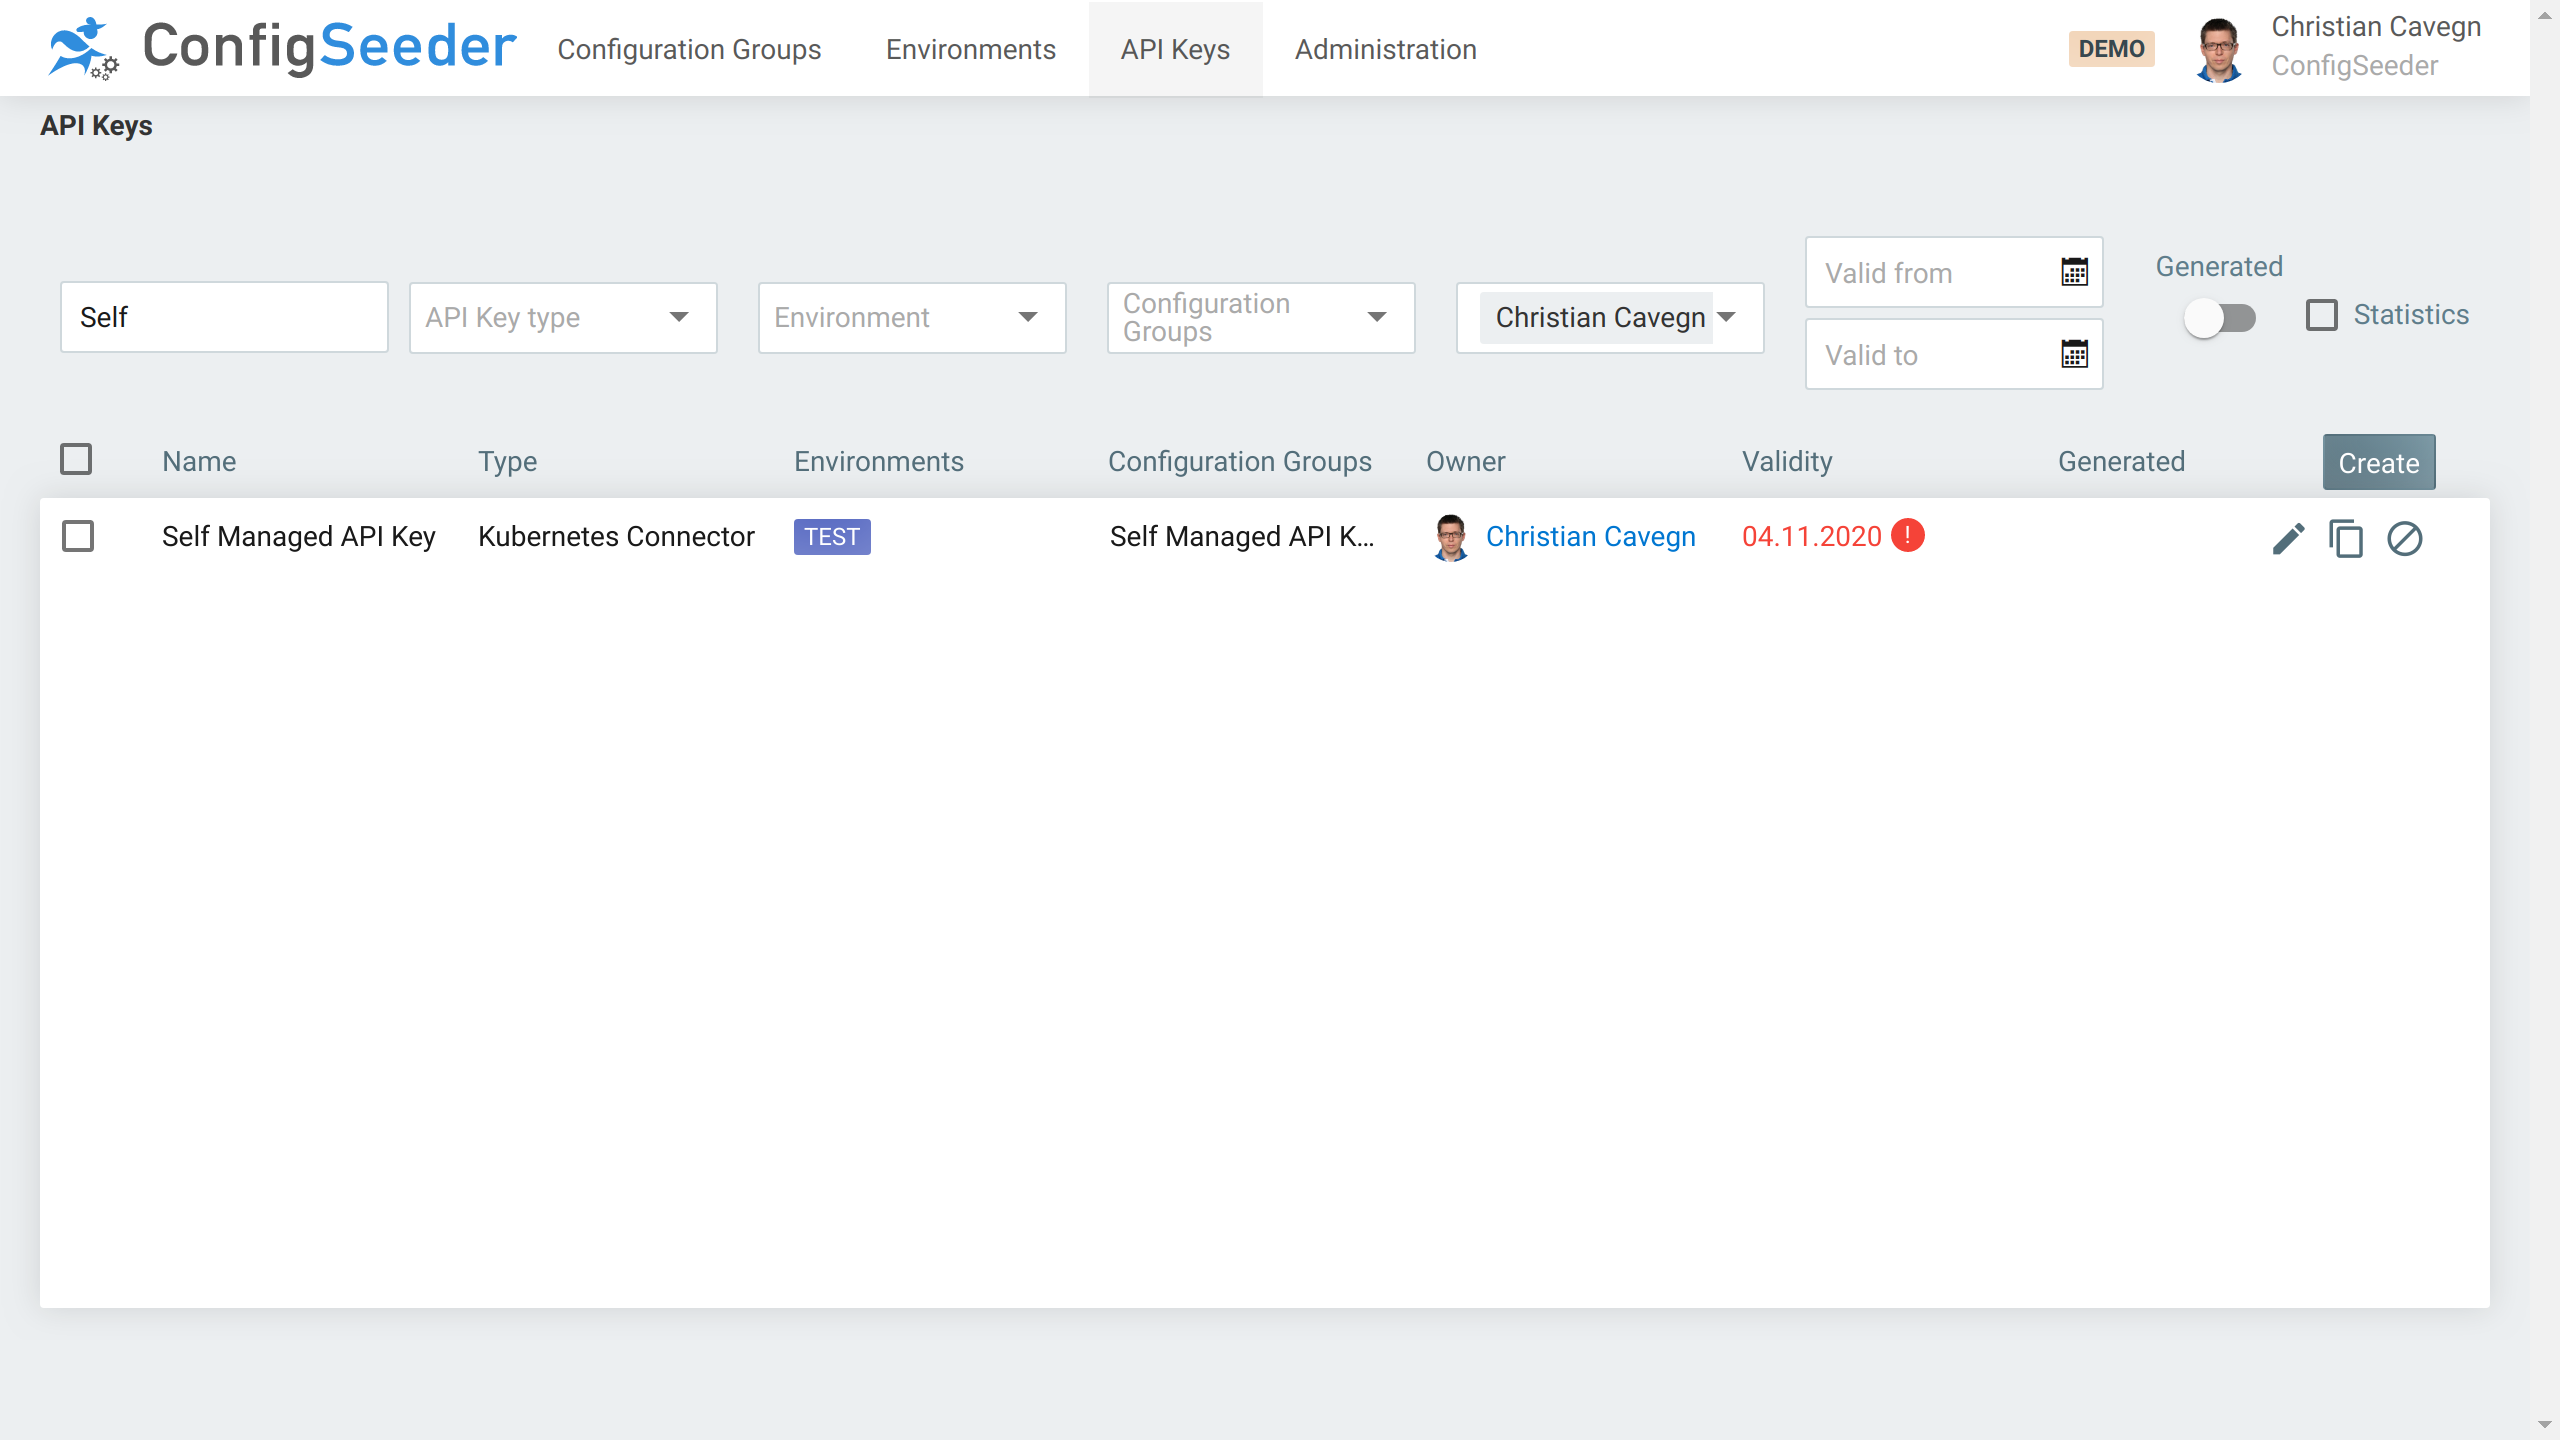
- Save the API Key in a file called apiKey-test.txt
- Open Configuration Group self-managed-apikey, create Assembly
Secret: API Keypointing to the secret, choose the same configuration groups, secret name & namespace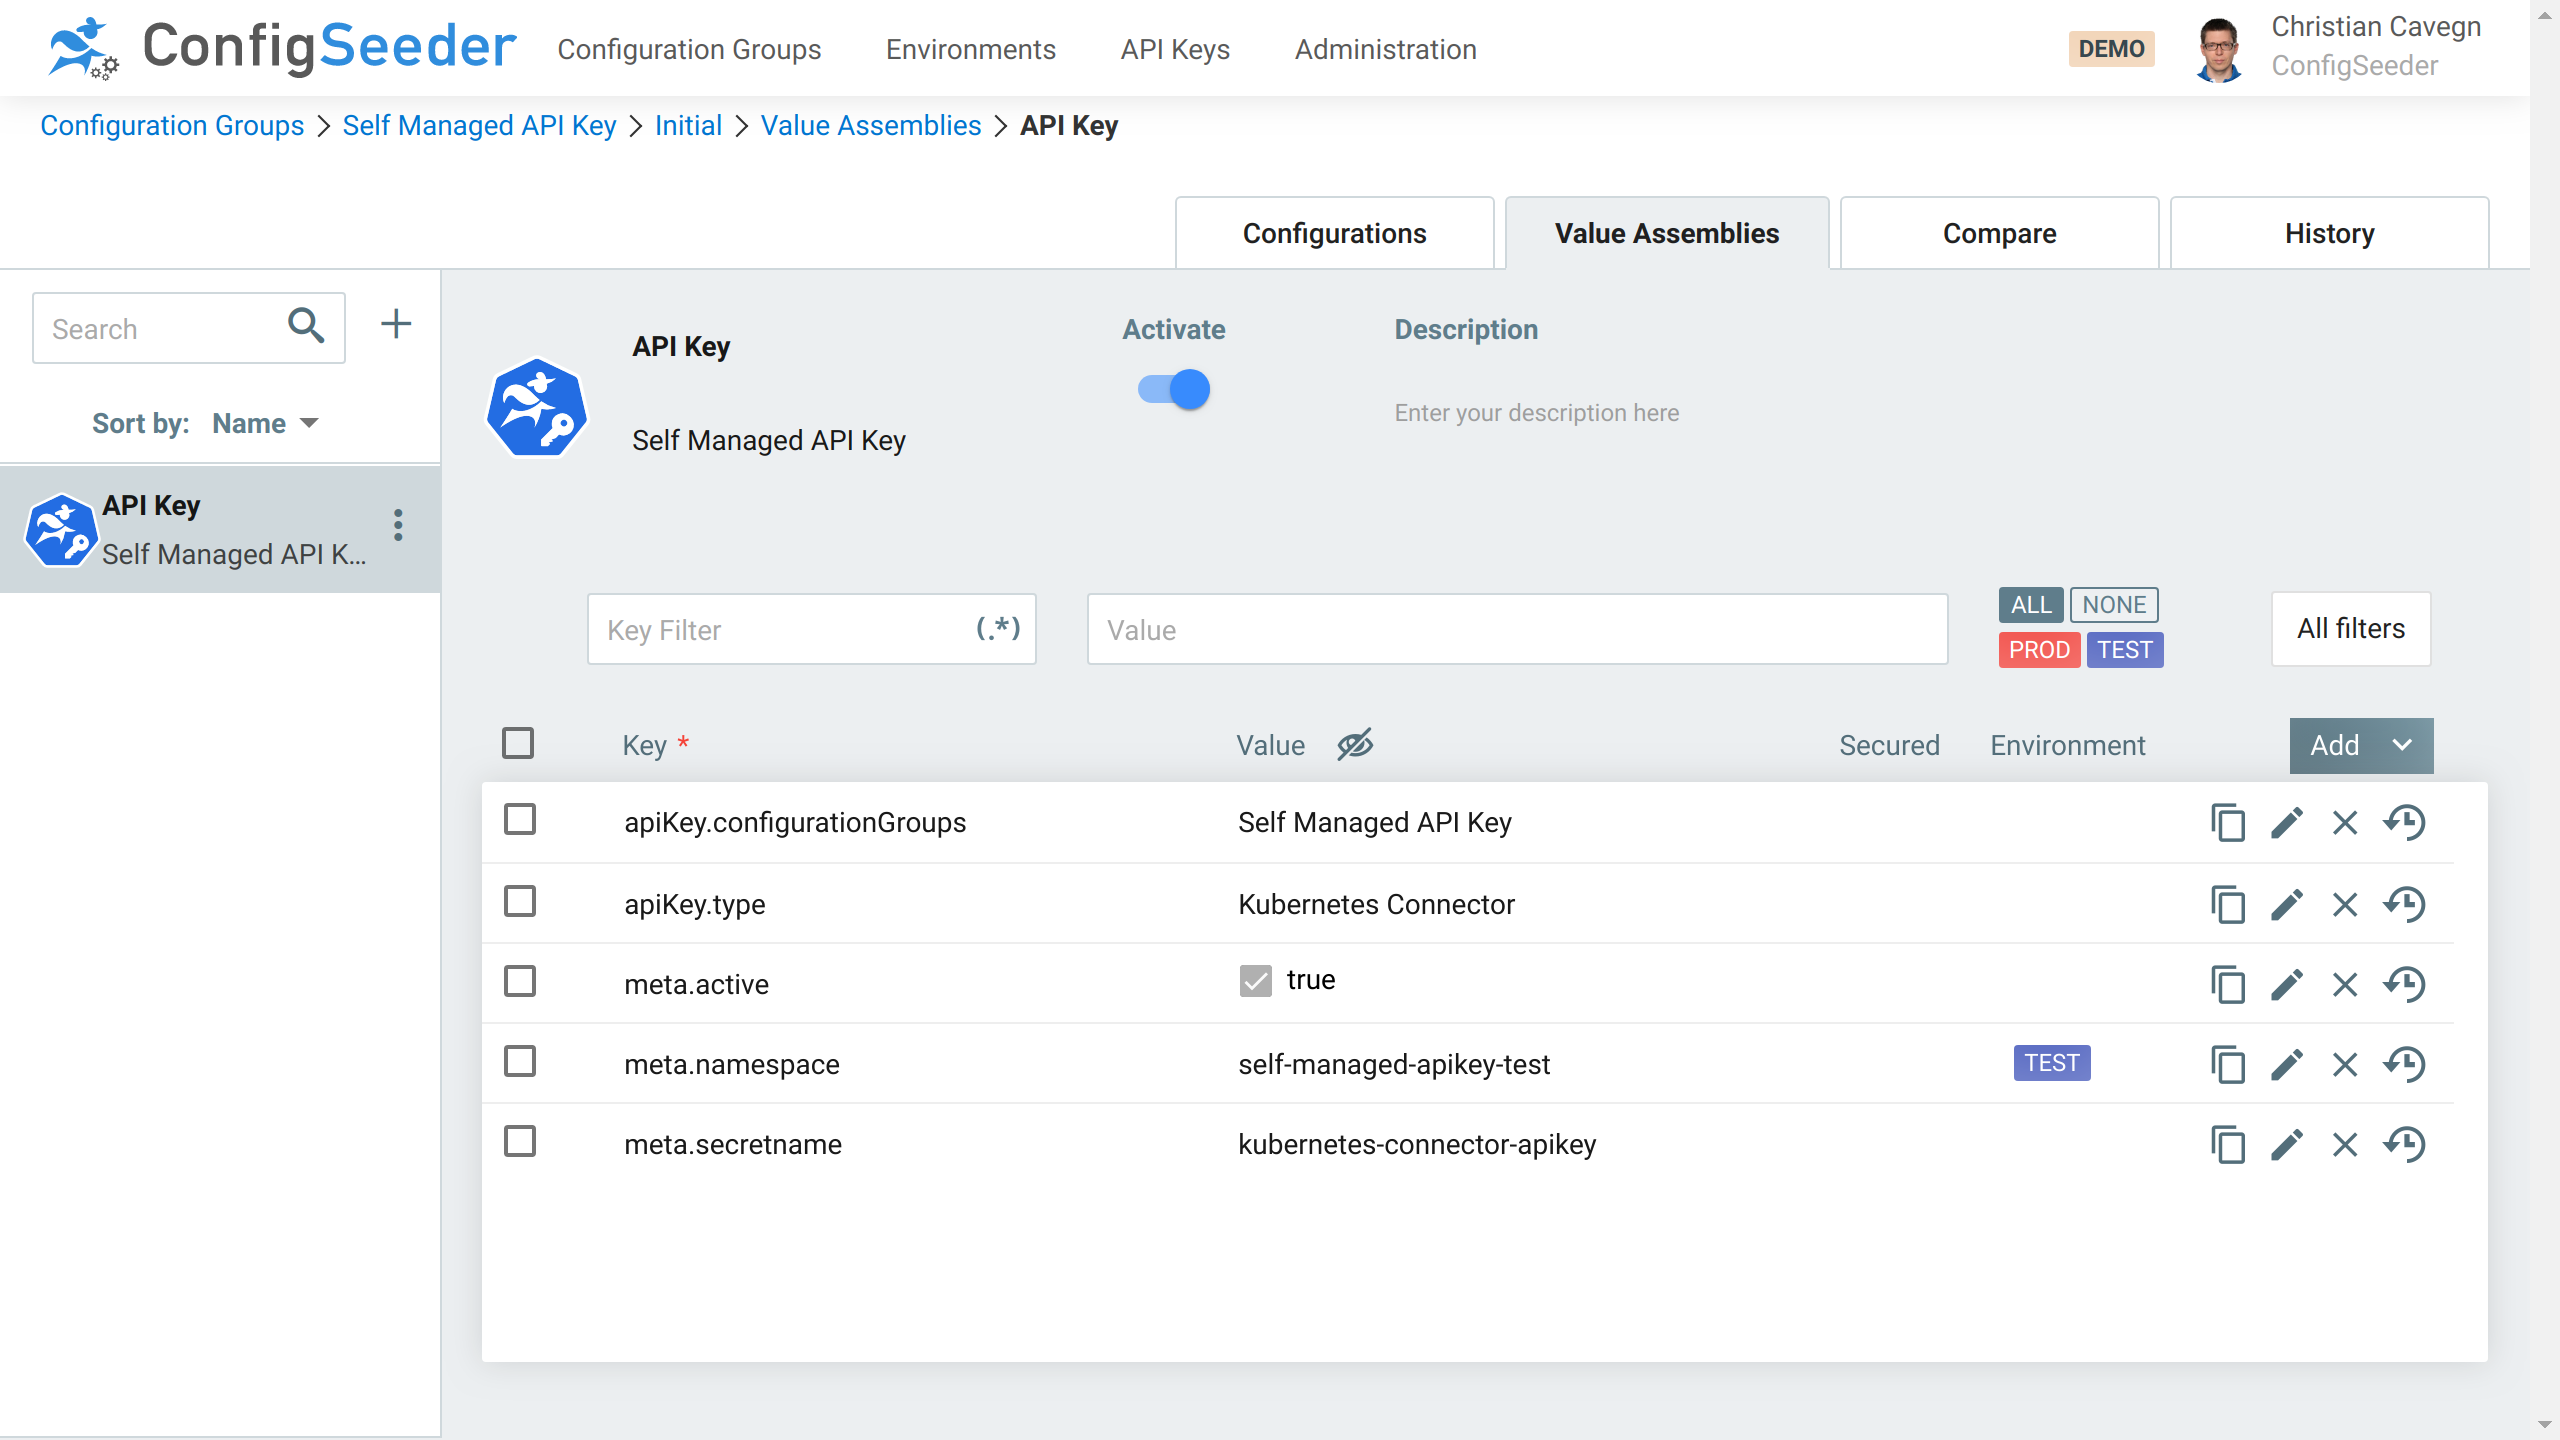
- Create the Secret containing the API Key and add the required annotations:
kubectl create secret generic -n self-managed-apikey-test kubernetes-connector-apikey --from-file=apiKey=apiKey-test.txtkubectl -n self-managed-apikey-test annotate secret kubernetes-connector-apikey configseeder.com/managed=true configseeder.com/module=AKM
- Install the Kubernetes Connector
helm upgrade -i -n self-managed-apikey-test -f values-selfprovisioning-test.yaml kubernetes-connector-selfmanaged-test configseeder-kubernetes-connector-cronjob-1.3.3+001.tar.gz
Verify the result
Wait until the CronJob was scheduled and verify the result.
First of all, there should be a new API Key visible in ConfigSeeder®. The new API Key was created by the Kubernetes Connector and is therefore marked as generated.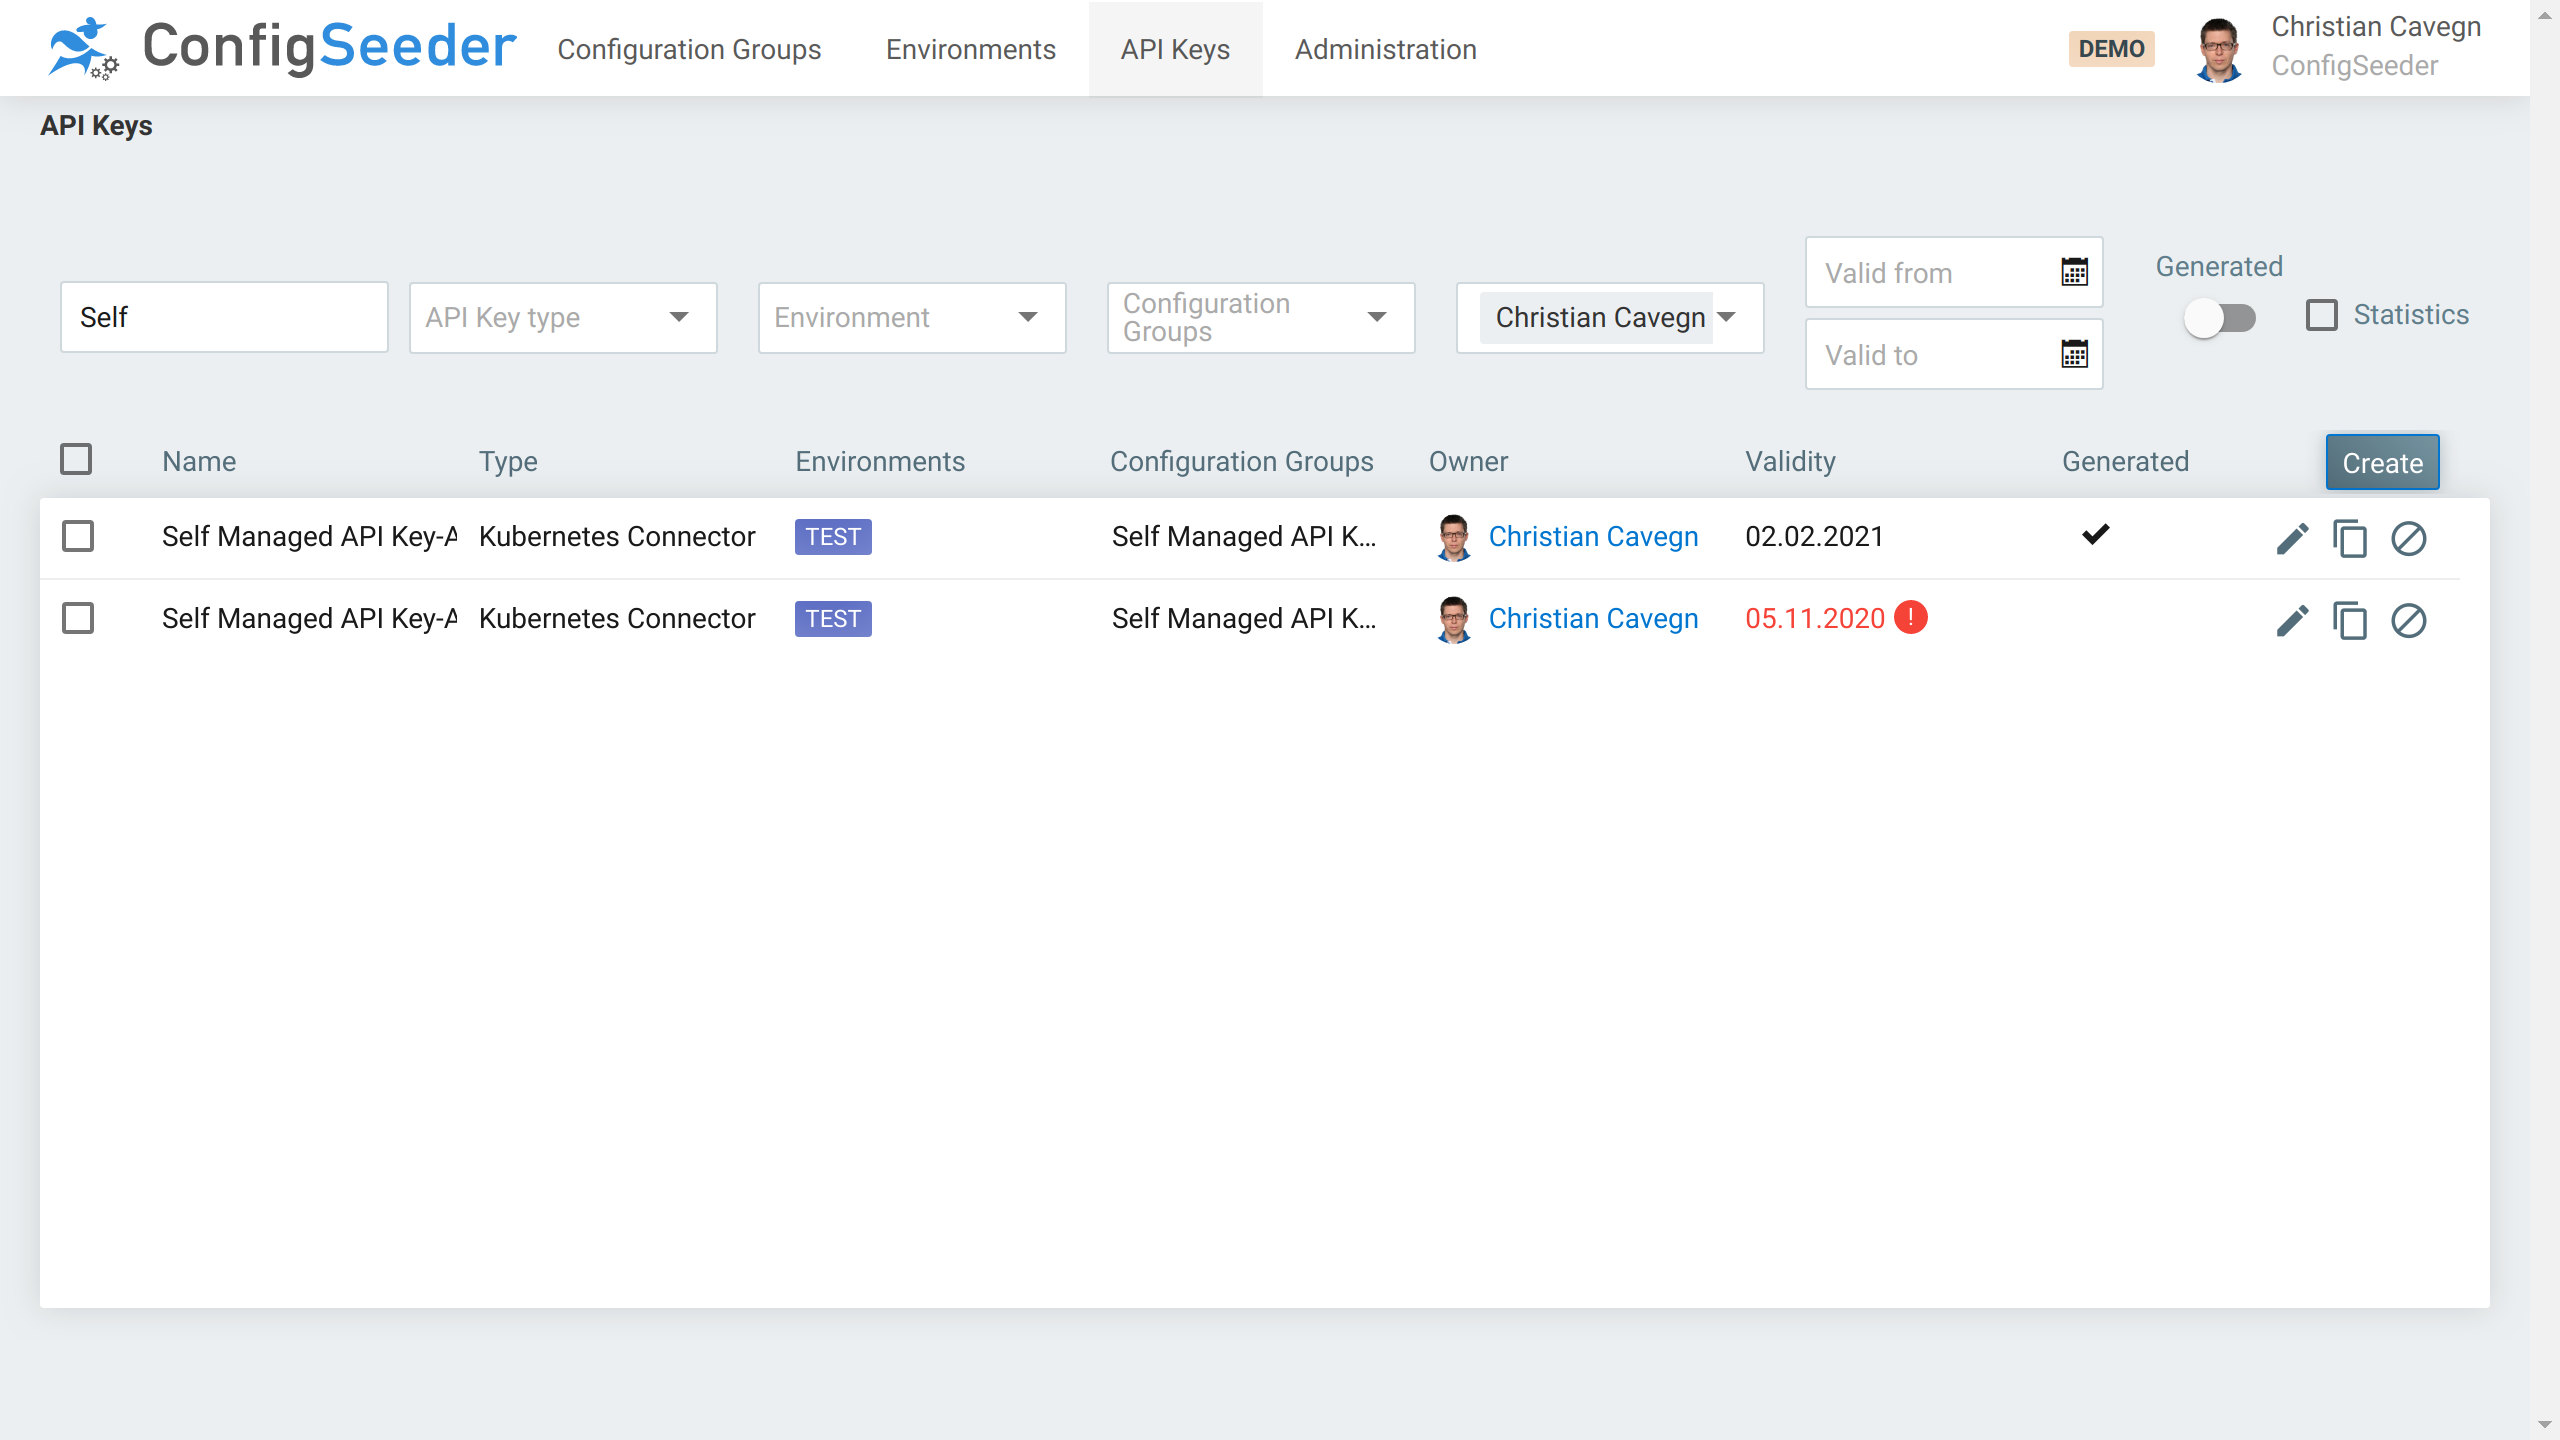
Secondly, the logs should contain the following information:
time="2020-11-04T06:35:16Z" level=info msg="Received ApiKey for secret" assemblyApplication="API Key" assemblyId=f6f5ff57-250d-4837-8036-8c68b9e2052a assemblyName="Self Managed API Key" assemblyType=K8S_SECRET_API_KEY objectName=self-managed-apikey-test/kubernetes-connector-apikey objectType=Secret
time="2020-11-04T06:35:16Z" level=info msg="API Key for secret must be recreated (apiKeyTypeChanged: false, applicationChanged: false, configGroupsChanged: false, environmentChanged: false, lifetimeEnding: true)" assemblyApplication="API Key" assemblyId=f6f5ff57-250d-4837-8036-8c68b9e2052a assemblyName="Self Managed API Key" assemblyType=K8S_SECRET_API_KEY objectName=self-managed-apikey-test/kubernetes-connector-apikey objectType=Secret
time="2020-11-04T06:35:16Z" level=info msg="Updated API Key Secret for Application" assemblyApplication="API Key" assemblyId=f6f5ff57-250d-4837-8036-8c68b9e2052a assemblyName="Self Managed API Key" assemblyType=K8S_SECRET_API_KEY objectName=self-managed-apikey-test/kubernetes-connector-apikey objectType=Secret
Important is, that the API Key was recreated because of an ending lifetime and that the Secret was updated.
Characteristics
Advantages:
- Only provide an API Key once, afterwards it gets managed automatically
- No Infrastructure Kubernetes Connectors required
- Works also for the API Keys of the Infrastructure Kubernetes Connectors
Limitations:
- It’s easy to reach a situation in which an API Key must be provided manually
- Delete Namespace or Secret holding the API Key
- Disable or Delete the Assembly describing the API Key and the Kubernetes Connector will delete its own API Key
- If access to additional configuration groups is required, the API Key must be renewed manually
(Unable to create an API Key with more permissions that the current API Key)
Please be aware that it is currently not possible to define an Assembly of type Secret: API Key that grants access to all configuration groups. As a result, a Kubernetes connector that manages it’s own API Key cannot have access to all configuration groups. We plan to lift this restriction in the future.
Conclusion
The presented use of the Kubernetes Connector allows reducing the number of manual tasks required for managing a ConfigSeeder Setup. If the mentioned limitations can be dealt with, you should definitely consider letting the Kubernetes Connector renew their own API Keys.